2009-07-24

How to Make Blog at Blogger.com

:hi: friend,

When i surf in myblog-log. there are so many that don't have any blog. May be they don't know how to make it. In this post I would like to share about how to make blog at bloggger/blogspot.

First of all, you must have a Gmail account to make your blog at blogspot. if you don' have Gmail account just click here to register.

After you finished. Follow this step.

1. Go to www.blogger.com.


How to make Blog at Blogger.com
2. Click The button like this to create your blog.blogspot tutorial3. Fill The form with your personal data completely.

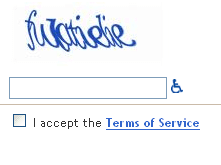
blogspot tutorial4. Fill in the form the same like the text picture above. and don't forget to checklist "I accept the Term Of Service, After that click continue.
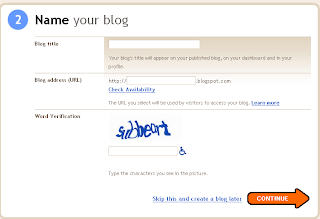
blogspot tutorial5. Fill the blog title with your desire title that you want, and fill the blog address with your name or everything. I recommend you to use a simple name in other that your visitor get easier to remmember your blog name.
blogspot tutorial
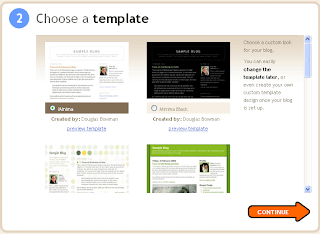
6. Choose your template with your desire.
blogspot tutorial
7. Now you are all done. Click continue and you will brought by blogger to the posting page.:sweaty:
blogspot tutorialFor the posting tutorial, I will give you in the next post. If you have a problem in doing this tutorial? just leave your comment below. I am waiting you friend:puppyeyes:....

2009-07-23

How To Make Refresh Effect

:hi: Friend,

How are you? Still with me, Now I would like to share about "How to Make Refresh Effect at your blogspot". It just very simple, follow this step.

How to make refresh effect at blogspot


1. Login at blogger.com.

2. Go to layout, then Edit HTML.

3. Add this code between <head> .... </head> .

<meta http-equiv="refresh" content="10"/>
4. Done:sweaty:.

Note: The "10" is the blog refresh time, it mean that your blog will refresh every 10 second. If you have a lot of script at your blog. I recommend you to change it into 30 or 50. thanks for your coming. Happy blogging....:woooh: Don't forget to leave comment if you get confused:puppyeyes:.

How To Make Your Label Walk Flash! Like My Label

:hi: friend,

Now I would like to share about how to make your label flash like my label. the tutorial is so simple. you want to know how?:ha?:.

Just follow this step....

How to Make Blog Label Walking Flash


1. Login to your blogspot.

2. Click Layout, then Edit HTML and check Expand Widget Template.

3. Find this code :

<b:section class='sidebar' id='sidebar' preferred='yes'>
4. Place this script under the blue code:

<b:widget id='Label99' locked='false' title='Labels' type='Label'>
<b:includable id='main'>
<b:if cond='data:title'>
<h2><data:title/></h2>
</b:if>
<div class='widget-content'>
&lt;object type="application/x-shockwave-flash" data="http://halotemplates.s3.amazonaws.com/wp-cumulus-example/tagcloud.swf" width="250" height="200" allowscriptaccess="always" &gt;
&lt;param name="movie" value="http://halotemplates.s3.amazonaws.com/wp-cumulus-example/tagcloud.swf" /&gt;
&lt;param name="bgcolor" value="#ffffff" /&gt;
&lt;param name="flashvars" value="tcolor=0x000000&amp;mode=tags&amp;distr=true&amp;tspeed=100&amp;tagcloud=&lt;tags&gt;
<b:loop values='data:labels' var='label'>
<a expr:dir='data:blog.languageDirection' expr:href='data:label.url' style='12'><data:label.name/></a>
</b:loop>
&lt;/tags&gt;" /&gt;
&lt;p&gt;Blogumulus by &lt;a href='http://www.roytanck.com/'&gt;Roy Tanck&lt;/a&gt; and &lt;a href='http://www.bloggerbuster.com'&gt;Amanda Fazani&lt;/a&gt;&lt;/p&gt;
&lt;/object&gt;
</div>
<b:include name='quickedit'/>
</b:includable>
</b:widget>
5. Save your template and you are all done:sweaty:.


Note: you can change the red text for the label size, purple text for the label color , and gray text for the label speed.

Okay friend, Do you have any problems? If you have just leave your comment below:puppyeyes:.

How To Make Auto Readmore to Blogspot.

:hi: friend,

This time I would like to share about How To Make Auto Readmore at Your Blogspot. Making usual readmore is wasting our time. we must place some code before and after our post. I have a solving that can make your readmore automatically generate when you publish your article. Check this out...:bringiton:.

How To Make Auto Readmore At Blogspot.


1. Log in to your blogspot.

2. Go to Layout then Edit HTML.

3. Find </head> code. use Ctrl+F to make you easier in finding </head> code.

4. Place the red script above the </head> .

<script type='text/javascript'>
var thumbnail_mode = "float" ;
summary_noimg = 250;
summary_img = 250;
img_thumb_height = 120;
img_thumb_width = 120;
</script>


<script type='text/javascript'>
//<![CDATA[
/******************************************
Auto-readmore link script, version 2.0 (for blogspot)

(C)2008 by Anhvo

visit http://en.vietwebguide.com to get more cool hacks
********************************************/
function removeHtmlTag(strx,chop){
if(strx.indexOf("<")!=-1)
{
var s = strx.split("<");
for(var i=0;i<s.length;i++){
if(s[i].indexOf(">")!=-1){
s[i] = s[i].substring(s[i].indexOf(">")+1,s[i].length);
}
}
strx = s.join("");
}
chop = (chop < strx.length-1) ? chop : strx.length-2;
while(strx.charAt(chop-1)!=' ' && strx.indexOf(' ',chop)!=-1) chop++;
strx = strx.substring(0,chop-1);
return strx+'...';
}

function createSummaryAndThumb(pID){
var div = document.getElementById(pID);
var imgtag = "";
var img = div.getElementsByTagName("img");
var summ = summary_noimg;
if(img.length>=1) {
imgtag = '<span style="float:left; padding:0px 10px 5px 0px;"><img src="'+img[0].src+'" width="'+img_thumb_width+'px" height="'+img_thumb_height+'px"/></span>';
summ = summary_img;
}

var summary = imgtag + '<div>' + removeHtmlTag(div.innerHTML,summ) + '</div>';
div.innerHTML = summary;
}
//]]>
</script>
After you do all the steps. Now save your work.

Back to your Edit HTML page, Check List the "Expand widget Template". Then find the code below.

<data:post.body/>
Replace that code with the code typed below.

<b:if cond='data:blog.pageType != "item"'>
<div expr:id='"summary" + data:post.id'><data:post.body/></div>
<script type='text/javascript'>createSummaryAndThumb("summary<data:post.id/>");</script>
<span class='rmlink' style='float:left'><a expr:href='data:post.url'>READ MORE - <data:post.title/></a></span>
</b:if>
<b:if cond='data:blog.pageType == &quot;item&quot;'><data:post.body/></b:if>

Now if you have done:sigh:, Just save your work...

Okay friend, you have a problem just leave your comment below. I will reply you as fast I can. see you in the next post, Happy blogging....:wave:

2009-07-20

How To Make Link Exchange Box

:hi:Friends,

Now I would like to share about "How To Make Link Exchange Box at Blogspot". It so simple, this tutorial it usually called "making text area" tutorial. But i have been modified it into a link exchange box. Now Lets start the tutorial..

  • First of all you must create your small banner, you can make your banner online at Cooltext.com.
  • After you create a banner, Download your cooltext banner then upload it at Photobucket.
  • Get your direct link from photobucket. then follow this step.
Insert this code to your blogspot by adding HTML.
  1. Log in to your blogspot.
  2. Click Layout.
  3. Click a Add a Gadget.
  4. Add HTML/Javascript Code.
  5. Copy and Paste the code typed below.

<center><p><a href="http://en.proryos.com" target="_blank"><img border="0" alt="en.proryos.com" src="http://i730.photobucket.com/albums/ww304/proryos/temp43024622up.png"/></a></p>

<p><textarea rows="6" cols="20" name="code"> <a href="http://en.proryos.com" target="_blank"><img border="0" alt="en.proryos.com" src="http://i730.photobucket.com/albums/ww304/proryos/temp43024622up.png"/></a></textarea></p></center>

<blink><p align="center"><b>Place at your blog and I will place yours</b></p></blink>


Change the red text with your blog url, then change the green text with your banner Url.

if you have finished your step, you will see the result like this.

en.proryos.com

Place at your blog and I will place yours

Are you finished? If you like this article please leave your comment friends. Thanks for your coming and see you in the next post....:wave:

How To Insert Clock Widget Into Your Blogspot.

:hi:hi friends, Do you still with me?

Today, I want to share about how to insert clock widget into your blogspot. I hope this widget can make your blog more beautiful than before. Do you want to know how?

ok. Lets get started.....

I know you are in a rust guy, so I will give you some clock to safe your time. here it is.

1. Login to blogger.com.
2. Click Layout Then at the sidebar click Add a Gadget.
3. Choose HTML/Javascript Like this.
blogger widget


4. Copy and Paste into a HTML box then save...

Clock Widget For Blogspot


The clock above just an example of the clock widget. if you want to get more models. just visit www.clocklink.com. I hope my article was useful for you. thanks for coming to my blog friends..:wave:

About Me


:hi: Hi all, My name is Wiryo Saputra. I come from Indonesia in the city of Jakarta. I'm here blogging to share with another people who need my help.

In this blog, I will write about Blogspot tutorial, Blogging Tips, SEO Tips, Internet Tips, Money Tips and all about my online experience. I hope my article can give you many changing to a better life.

If you have an interesting experience online, just share in this blog to add our knowledge. and to know personally about you and me. This is my contact if you want to contact me by phone or by Yahoo messenger.

Phone : +628118401221
YM : bisniz@ymail.com

I wait your call friend:puppyeyes:. thank you very much for coming to my blog. see ya....


:wave: